

Environmental Management Location & Parameter Configuration
The "Environmental Locations" tool is located within the Settings Menu. This tool allows team members to add Locations, add/edit Test Sites and configure test Parameters for each test site.
Note: To begin recording environmental data, each step listed here needs to be completed. This includes, (1) creating a Location; (2) configuring the Test Site(s); and (3) configuring Parameters.
Tip: It is easy to get confused about the difference between a "Location" and a "Test Site". Most often, they are one in the same; but sometimes a single Location may have multiple Test Sites (sample sites). For more information on the difference, check out our Knowledge Base article, "Environmental Locations vs Test Sites".
Creating Environmental Locations
Whenever you want to record Environmental Data for an Area/Exhibit (tank/habitat), you must first "link" it (or identify it) as an Environmental Location. This simply tells the system that the Area/Exhibit needs to appear in the proper tools for environmental monitoring and data entry. Below are the steps required to link a configured Area/Exhibit as an Environmental Location.
-
Click on the Settings button (gear icon) in the upper left utilities menu.
-
Click on the Environmental Locations link.
-
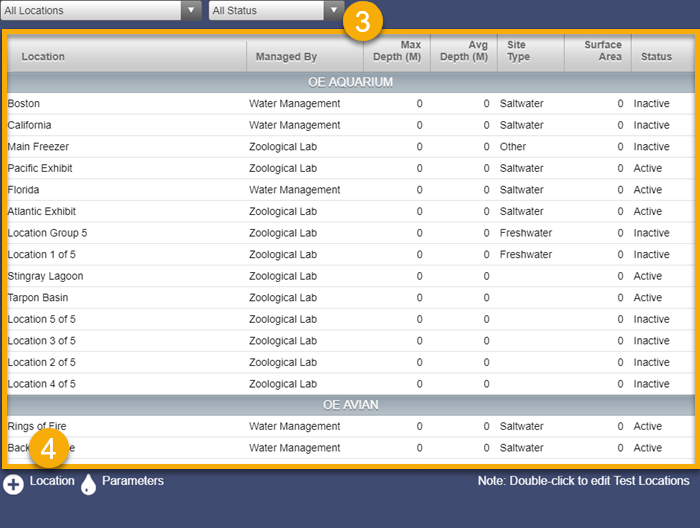
You will now see a table of all Environmental Locations that have already been configured in the system. You can filter this list by Facility and Status using the drop-down menus above the table.
-
To create (or link) a new Environmental Location, click on the plus [+] sign icon in the lower left-hand corner of the window. A new panel for creating Locations will appear.
-
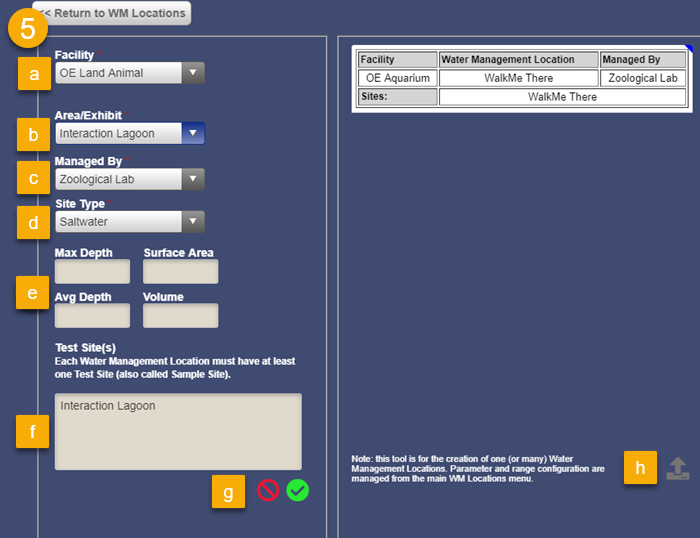
Make a selection for each of the following:
-
Facility: Select the Facility from the drop-down menu where the Area/Exhibit (tank/habitat) is located.
-
Area/Exhibit: Select the Area/Exhibit (tank/habitat) from the drop-down menu that needs to be linked or identified as a Environmental Location.
NOTE: If you need to create an Environmental Location that is NOT an existing Area/Exhibit (such as source water, swimming pool, pump room, etc.) you will need to create a non-animal, or "Environmental Results Only" Area/Exhibit using the Facility & Exhibit Management configuration tool in the Settings Menu.
-
Managed By: THIS OPTION WILL ONLY SHOW IF THE USER HAS DUAL PERMISSION TO MANAGE BOTH ZOOLOGICAL AND WATER MANAGEMENT FACILITIES. Otherwise the system will default to the Permission assignment of the User creating the location. All facilities that are a part of zoological operations (such as animal exhibits/habitats) should be assigned to Zoological Lab, and test results will typically be entered from within that Facility. Other systems not associated with animal operations (or not linked to an area/exhibit/habitat from a facility) should be assigned to Water Management and results will be entered from within the Environmental module.
-
Site Type: Enter whether the test location is salt water, fresh water or other.
-
Location Detail [optional]: Enter relevant information about the test location.
-
Test Sites: This value will default to the same name as the Location (which will be the area/exhibit name it is linked to in step "b"). Occasionally, however, there may be multiple test sites (or sample sites) for a single Location (click HERE to learn more about Locations vs Test Sites). For example, you might have a large aquarium habitat that has multiple samples tested from different places such as the surface, bottom, skimmer, etc. You can add multiple test sites to a single Location by typing the name of each test site as a new line in the Test Site(s) field. For more information about test sites, please see the Test Sites section below.
-
Save: Click the green check mark when you have completed the Location information. This will create a preview "card" in the staging panel on the right hand side; allowing you to create multiple Locations at one time without interrupting work flow.
-
Upload: When you are finished entering and reviewing Location information, click on the Upload icon in the lower right hand corner of the staging panel. This will upload each card from the staging panel into OERCA.
Configuring Test Sites
NOTE: When you are configuring Environmental Locations, OERCA will automatically create a single "Test Site" that matches the name of the Location. In most circumstances this will provide the setup necessary to meet your testing and reporting requirements. There may be instances; however, when you need to create multiple test sites (or sample sites) within a singe water management Location.
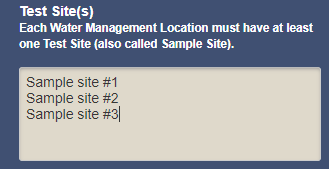
The image below shows the Test Site configuration tool that is available when initially adding an Environmental Location. As mentioned, OERCA will automatically create a single Test Site for you; however, if you need multiple test sties within one Location you can add as many as necessary by entering a name for each new Test Site on a separate line (as shown in the image below). The name of each Test Site will show in data entry tools when recording test results in OERCA. This is also the name that will appear in reports and analytics.
If you need to Edit or Deactivate a Test Site within an Environmental Location, you can do so by double-clicking on the Location name to launch the editor panel.
Once the editor panel is open, you can double click on a Test Site to edit the name, or mark it as active (or not active).
Adjust your information as needed, and click the green check mark when complete.
Configuring Test Parameters
The Parameters tool allows you to configure and fully customize which test indicators (parameters) you want to record for each Location. You can configure both the parameter as well as the order you want them to appear. The order the that parameter list appears here will be the same as how it will appear in the Manual Entry tool. You can also change the Low and High value for any parameters. These values are used to trigger alerts via our Communication Center if any test results are outside of the prescribed range.
NOTE: All Test Sites configured as part of a Location will inherit the parameter configuration and high/low ranges of their parent Location.
To configure Parameters for a Location, follow these steps:
-
Select a Location and then launch the Parameters configuration tool by clicking on the Parameters icon below the Locations table.
-
System Parameter - Test Types: The table on the left contains OERCA's master list of test parameters. Select parameters from the list that are tested for each Location.
-
Control Arrows: The arrows in the center between the two tables allow you to add or remove selected parameters between the system list (on the left) and the configured list (on the right).
-
Configured Parameters: The table on the right displays your configured test parameters. You can drag and drop the order of the parameter list to suit your workflow. The order in which these parameters are arranged will match how they show up in the manual entry tool.
-
Save: When you have completed configuring the parameter list for the selected Location, click the green check mark to save you list.
TIP: You can click on the "Apply to" button to assign these configured parameters and ranges to multiple Locations which can save you time. Learn how.
Adjust High/Low Settings for Each Parameter
-
You can customize the high/low settings for each parameter by double clicking the parameter from your configured list on the right.
-
Enter high/low values for that parameter and click the green check mark to save.
Apply Configuration to Multiple Locations

-
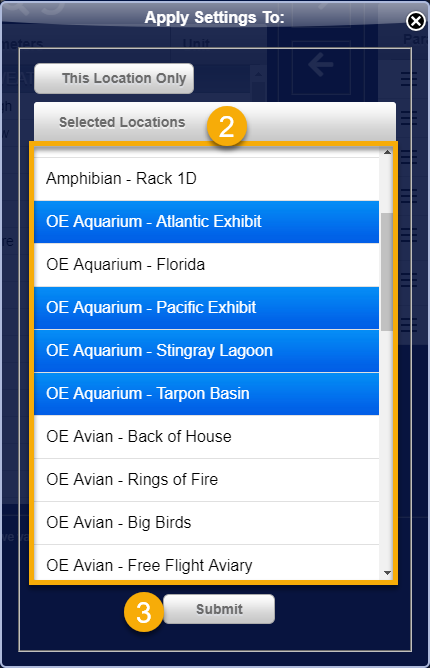
Click on the "Apply to" button beneath the configuration table.
-
Select each location that you want to copy the configured parameters to by clicking on them and highlighting each in blue.
-
Click the Submit button.
Comments
0 comments
Please sign in to leave a comment.